Disqus Commenting System with Django


Do you want to improve your blog commenting system? Looking to form a community with a commenting system? It’s time for you to look at DISQUS commenting system. Today, I will share the guide to implementing DISQUS comments on your Django blog.
Disqus provides a code snippet to integrate the Disqus Comments System i.e., a block of javascript code added to Django templates.
Let's begin installing Disqus
Create an account on Disqus.com:
To create an account on Disqus visit their official website and follow the following steps:
Step 1: Click on "I want to install Disqus on my site"
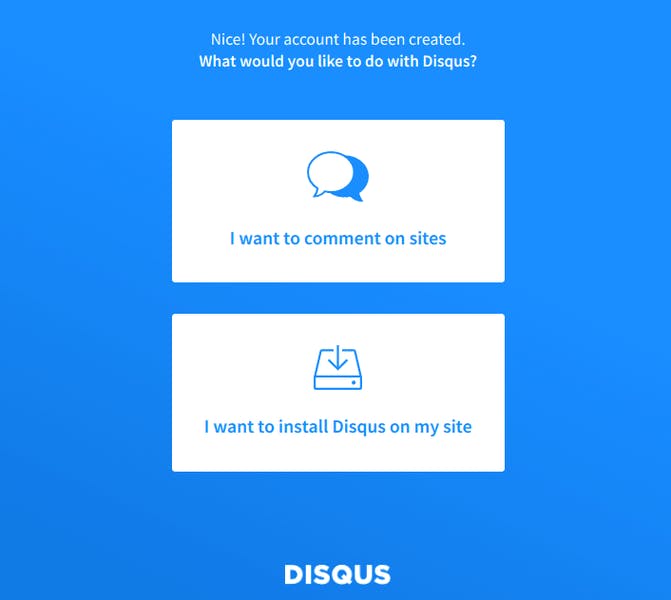
Step 2: Fill in your details and click on the "Create Site Button"

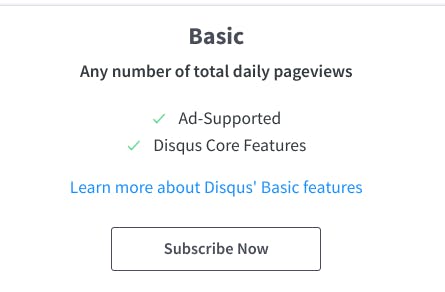
Step 3: Now, they will ask you to subscribe to a plan, you can choose the free plan, for now, the BASIC one, and click on subscribe now button.
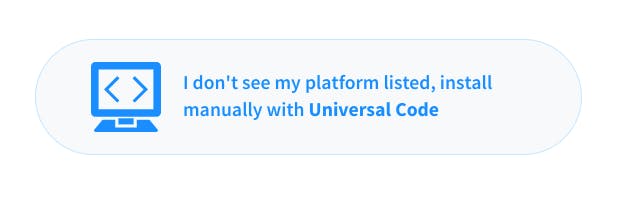
Step 4: Now, they will ask you what platform your site is on. At the bottom, there is a button "I don't see my platform listed, install manually with universal code", click on it
Now you will get your code, something like this.
<div id="disqus_thread"></div>
<script>
 /**
 * RECOMMENDED CONFIGURATION VARIABLES: EDIT AND UNCOMMENT THE SECTION BELOW TO INSERT DYNAMIC VALUES FROM YOUR PLATFORM OR CMS.
 * LEARN WHY DEFINING THESE VARIABLES IS IMPORTANT: https://disqus.com/admin/universalcode/#configuration-variables */
 /*
 var disqus_config = function () {
 this.page.url = PAGE_URL; // Replace PAGE_URL with your page's canonical URL variable
 this.page.identifier = PAGE_IDENTIFIER; // Replace PAGE_IDENTIFIER with your page's unique identifier variable
 };
 */
 (function() { // DON'T EDIT BELOW THIS LINE
 var d = document, s = d.createElement('script');
 s.src = 'https://raturitest.disqus.com/embed.js';
 s.setAttribute('data-timestamp', +new Date());
 (d.head || d.body).appendChild(s);
 })();
</script>
<noscript>Please enable JavaScript to view the <a href="https://disqus.com/?ref_noscript">comments powered by Disqus.</a></noscript>
Select and Copy the code you get on the Disqus website not the above one. We will use the copied code in just a while.
Integrate Disqus code snippet in Django templates
To use this Disqus code snippet inside Django, let's do a little bit of modification.
First, create a template named comments.html inside your templates directory and paste the code snippet you have copied. Now, modify your snippet like this:
<div id="disqus_thread"></div>
<script>

// Modify Start

// change yourdomain.in to your domain
var disqus_config = function () {
this.page.url = "https://yourdomain.in/blog/{{url}}/";
 this.page.identifier = "{{url}}";
 };

// Modify End

(function() { // DON'T EDIT BELOW THIS LINE
var d = document, s = d.createElement('script');
s.src = 'https://test-cznbonimn3.disqus.com/embed.js';
s.setAttribute('data-timestamp', +new Date());
(d.head || d.body).appendChild(s);
})();
</script>
<noscript>Please enable JavaScript to view the <a href="https://disqus.com/?ref_noscript">comments powered by Disqus.</a></noscript>

 <script>

</script>
Replace the value of this.page.url where it says yourdomain.in with your actual domain.
Key points to notice here which we will replace later:
this.page.url: this should be the complete URL of your article.
this.page.identifier: this should be the unique identifier such as id or slug.
{{url}}: this is the slug we will pass to this template.
Load Disqus comments - Final Step
As a general idea, Disqus will associate a unique thread with every page. Let's say we have 5 blog posts, so in this case, Disqus will make a thread that contains information like all the comments, likes, and metadata for each of the 5 URLs of blog posts. You can learn more about how Disqus works if you are curious. But it's optional, a general idea is enough to integrate it.
Integrate it with an example, suppose I have a model named Blog
class Blog(models.Model):
 title = models.CharField(max_length=255, unique=True)
 slug = models.SlugField(max_length=255)
 body = models.TextField()
 posted = models.DateField(db_index=True, auto_now_add=True)
 description = models.CharField(max_length=255,null=True)

 def __str__(self):
 return self.title

 def get_absolute_url(self):
 return reverse('blog:detail',kwargs={'slug':self.slug})
Create a URL for your blog
# urls.py

from django.urls import path
from .views import *
app_name = "blog"

urlpatterns = [
 path('blog/<slug:slug>/',blogview,name="detail"),
]
Now, create a view for your URL
# views.py

from django.shortcuts import render
from .models import Blog

def blogview(request,**kwargs):
 slug = kwargs.get('slug')
 context = {'object':Blog.objects.get(slug=slug)}
 return render(request,'blog_detail.html',context)
Now, create a template blog_detail.html inside your templates directory.
To access data of the blog, for which slug was passed to the Django view, we can access its data like this inside our template:
<!-- blog_detail.html -->

<h1>{{ object.headline }}</h1>
<p>{{ object.content }}</p>
<p>Reporter: {{ object.reporter }}</p>
<p>Published: {{ object.pub_date|date }}</p>
<p>Date: {{ now|date }}</p>

<!-- Pass URL to comments.html, we have created earlier like this -->

{% include 'comments.html' with url=object.slug %}
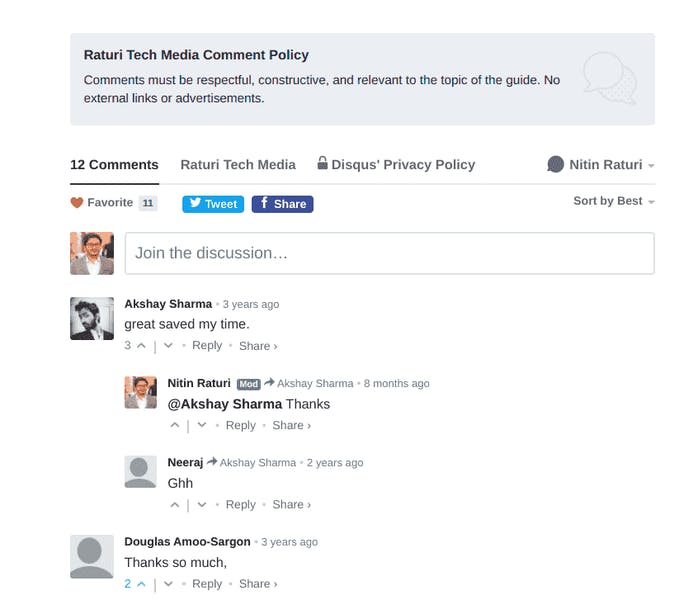
Now, visit your blog post URL, which should be something like this yourdomain.in/blog/
You can see your Disqus commenting system loaded to your site.