


There are a lot of WYSIWYG editors available on the internet, some are paid and some are free. After exploring and experimenting with various editors I found tinymce, one of the best WYSIWYG editors. So in this tutorial, I will show how you can install and integrate this editor into your Django admin from scratch.
TinyMCE is a rich-text editor that allows users to create formatted content within a user-friendly interface. With Django admin, it allows developers or users to add rich text directly from the admin panel. Django's default textarea is replaced by tinymce widget that transforms it into a WYSIWYG editor.
You can watch this video tutorial also or proceed further.
If you have any confusion about code snippets or directory structure, you can refer to this GitHub repository which contains the source of everything I explain here.
Create a Blog model
For this tutorial, I am creating a blog model and adding a body field to add. Later this body field will be transformed into a WYSIWYG widget. If you already have a model, you can skip this part and consider body field only.
from django.db import models


class Blog(models.Model):
    title = models.CharField(max_length=255, unique=True)
    body = models.TextField()

    def __str__(self):
        return self.title
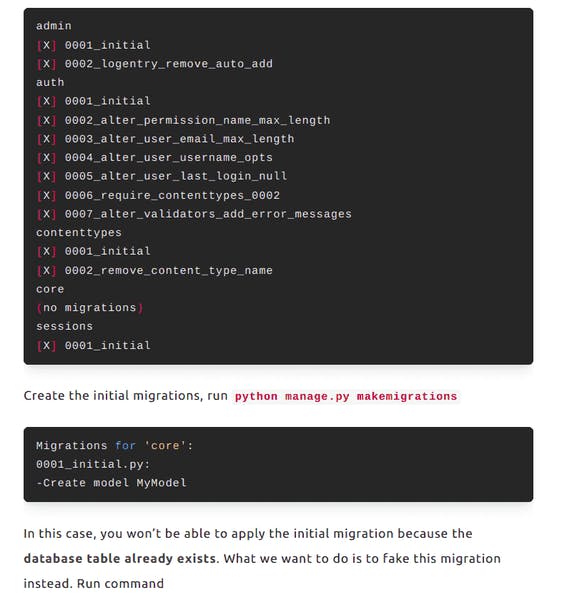
Run migrations
python manage.py makemigrations
python manage.py migrate
Override admin form for Tinymce widget
Right now in your admin panel, the body field that you just added as TextField is rendered as a html textarea element. By default, it does not have any class associated with it. You have to give a custom className to this element and later tinymce will transform it using the className selector.
You can give any className. For this tutorial I am naming it richtext_field.
from django import forms
from .models import *


class BlogAdminForm(forms.ModelForm):
    body = forms.CharField(widget=forms.Textarea(attrs={'id': "richtext_field"}))

    class Meta:
        model = Blog
        fields = "__all__"
Include tinymce static files
Now we have the model and class name setup. The next thing you need is to load the static files (CSS, JS) in your admin base template. First, verify your template directory location, mine is set like this.
TEMPLATES = [
    {
        'BACKEND': 'django.template.backends.django.DjangoTemplates',
        'DIRS': [os.path.join(BASE_DIR, 'templates')],
        'APP_DIRS': True,
        'OPTIONS': {
            'context_processors': [
                'django.template.context_processors.debug',
                'django.template.context_processors.request',
                'django.contrib.auth.context_processors.auth',
                'django.contrib.messages.context_processors.messages',
            ],
        },
    },
]
To override Django's base template, create a base.html file inside templates/admin/.
├── manage.py
├── README.md
├── requirements.txt
├── templates
│   └── admin
│       └── base.html
Now inside the template base.html, let's add tinymce configuration.
{% extends "admin/base.html" %}
{% load static %}

{% block footer %}
    {{ block.super }}
    <script src="https://cdn.tiny.cloud/1/YOURAPIKEY/tinymce/5/tinymce.min.js"
            referrerpolicy="origin"></script>
    <script>

        tinymce.init({
            selector: '#richtext_field',
            plugins: 'print preview importcss tinydrive searchreplace autolink autosave save directionality visualblocks visualchars fullscreen image link media template codesample table charmap hr pagebreak nonbreaking anchor toc insertdatetime advlist lists  wordcount imagetools textpattern noneditable help charmap quickbars emoticons blockquote',
            menubar: 'file edit view insert format tools table tc help',
            toolbar: 'undo redo | bold italic underline strikethrough | fontselect fontsizeselect formatselect | alignleft aligncenter alignright alignjustify | outdent indent |  numlist bullist checklist | forecolor backcolor casechange permanentpen formatpainter removeformat | pagebreak | charmap emoticons | fullscreen  preview save print | insertfile image media pageembed template link anchor codesample | a11ycheck ltr rtl | showcomments addcomment',
            autosave_ask_before_unload: true,
            autosave_interval: '30s',
            autosave_prefix: '{path}{query}-{id}-',
            autosave_restore_when_empty: false,
            autosave_retention: '2m',
            image_advtab: true,
            automatic_uploads: false,
            link_list: [
                {title: 'My page 1', value: 'https://www.tiny.cloud'},
                {title: 'My page 2', value: 'http://www.moxiecode.com'}
            ],
            image_list: [
                {title: 'My page 1', value: 'https://www.tiny.cloud'},
                {title: 'My page 2', value: 'http://www.moxiecode.com'}
            ],
            image_class_list: [
                {title: 'None', value: ''},
                {title: 'Some class', value: 'class-name'}
            ],
            importcss_append: true,
            templates: [
                {
                    title: 'New Table',
                    description: 'creates a new table',
                    content: '<div class="mceTmpl"><table width="98%%"  border="0" cellspacing="0" cellpadding="0"><tr><th scope="col"> </th><th scope="col"> </th></tr><tr><td> </td><td> </td></tr></table></div>'
                },
                {title: 'Starting my story', description: 'A cure for writers block', content: 'Once upon a time...'},
                {
                    title: 'New list with dates',
                    description: 'New List with dates',
                    content: '<div class="mceTmpl"><span class="cdate">cdate</span><br /><span class="mdate">mdate</span><h2>My List</h2><ul><li></li><li></li></ul></div>'
                }
            ],
            template_cdate_format: '[Date Created (CDATE): %m/%d/%Y : %H:%M:%S]',
            template_mdate_format: '[Date Modified (MDATE): %m/%d/%Y : %H:%M:%S]',
            height: 600,
            image_caption: true,
            quickbars_selection_toolbar: 'bold italic | quicklink h2 h3 blockquote quickimage quicktable',
            noneditable_noneditable_class: 'mceNonEditable',
            toolbar_mode: 'sliding',
            spellchecker_ignore_list: ['Ephox', 'Moxiecode'],
            tinycomments_mode: 'embedded',
            content_style: '.mymention{ color: gray; }',
            contextmenu: 'link image in',
            a11y_advanced_options: true,
            mentions_selector: '.mymention',
            mentions_item_type: 'profile'
        });
    </script>
{% endblock %}
Set tinymce API KEY
To get your tinymce free APIKEY. Create an tinymce account if you don't have one. After login:
Step1: Click on *Approved Domain to your left and add localhost and your domain, where you want to add tinymce.
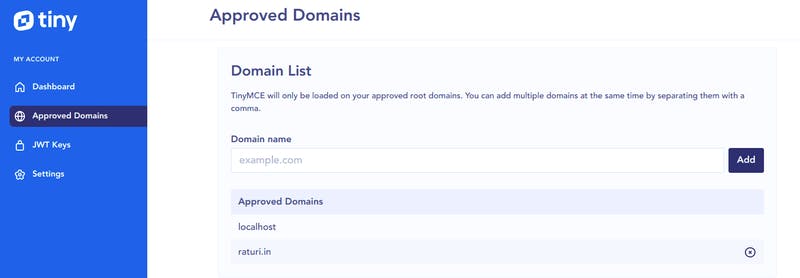
Step2: Click on Dashboard to your left and copy the API KEY.
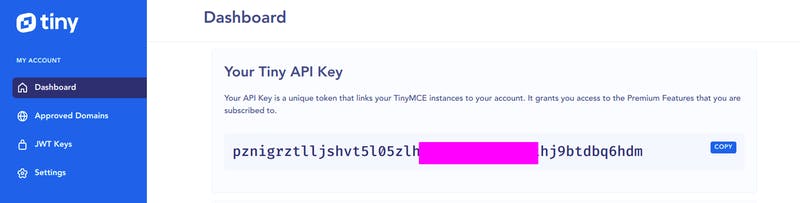
Now, that you have your API key, open your base.html and replace the APIKEY inside the script tag src attribute where it says YOURAPIKEY.
<script src="https://cdn.tiny.cloud/1/YOURAPIKEY/tinymce/5/tinymce.min.js"
        referrerpolicy="origin"></script>
<script>
Register blog model
Add your blog model to your admin page. Inside admin.py register your Blog model and set the form to the BlogAdminForm you created few minutes before. This will override Django's default text area with the one you added in the form with the class name.
from django.contrib import admin
from .models import *
from .forms import *


class BlogAdmin(admin.ModelAdmin):
    form = BlogAdminForm


admin.site.register(Blog, BlogAdmin)
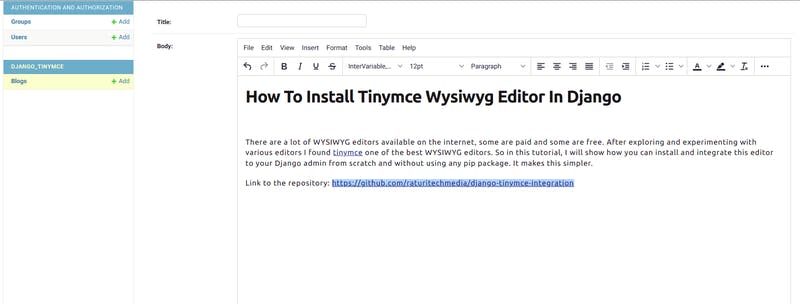
Now, run your server and visit the blog admin page. Your body field should look like this
Adding Syntax highlighting for tinymce
Now, if you are a developer just like me who want to write their own blog posts then you will have to add code snippets through this tinymce WYSIWYG editor. Now when you render these code snippets in your blog posts, they will not look great. So you have to use some syntax highlighter.
You can render this body field to your templates like this. Make sure you add safe filter.
{{object.body | safe}}
Now add some highlighting to your code snippets. Here is a list of syntax highlighters that you can include in your body and see the magic.
Right now, I am using a prism. But you can use it at your convenience. You have to add the CSS, js files provided by these above websites in your body element. Mine looks like this.
That's all.