


Sometimes we have a very simple web app that does not have any authentication and authorization implemented and we want to restrict a specific URL or whole IP or web app then instead of implementing the whole auth flow, we can protect our Nginx web server with a secure auth flow with username and password.
In this guide, we’ll demonstrate how to password protect assets on an Nginx web server running on Ubuntu.
How do I enable authentication in Nginx?
Prerequisites: Nginx
Step 1:
sudo sh -c "echo -n 'raturi:' >> /etc/nginx/.htpasswd"Step 2:
sudo sh -c "openssl passwd -apr1 >> /etc/nginx/.htpasswd"Step 3:
cat /etc/nginx/.htpasswdStep 4:
sudo nano /etc/nginx/sites-enabled/defaultStep 5: Inside location block add new line
auth_basic_user_file /etc/nginx/.htpasswd;Step 6:
sudo service nginx restart
Let's understand each step in detail
Prerequisites
Nginx is required, if you don't have you can install it by the following command.
sudo apt-get update
sudo apt-get install nginx
Step 1
First, you have to add a username inside this /etc/nginx/.htpasswd. I am adding raturi as a username, but you can use whatever name you’d like:
sudo sh -c "echo -n 'raturi:' >> /etc/nginx/.htpasswd"
Step 2
Now, you have to add an encrypted password, run
sudo sh -c "openssl passwd -apr1 >> /etc/nginx/.htpasswd"
Here you will be asked for a password, enter your password, and you are done.
Step 3
You can verify your password with the below command
cat /etc/nginx/.htpasswd
# Output
raturi:$apr1asdasdx$/fWd42iVOYMslEDDHewuw
Step 4
Now that you have a file with users and passwords stored in a format that Nginx can read, the next step is to set up Nginx to check this file before serving any restricted content.
In this tutorial, the default Nginx server block file is opened but if you already have another nginx file setup, then you can open that.
sudo nano /etc/nginx/sites-enabled/default
Inside the file, your server block should look somewhat similar to this: /etc/nginx/sites-enabled/default
server {
    listen 80 default_server;
    listen [::]:80 default_server ipv6only=on;

    root /usr/share/nginx/html;
    index index.html index.htm;

    server_name localhost;

    location / {
        try_files $uri $uri/ =404;
    }
}
Step 5
To set up authentication, you need to decide on the context to restrict. Among other choices, Nginx allows you to set restrictions on the server level or inside a specific location. In our example, we’ll restrict the entire document root with a location block, but you can modify this listing to only target a specific directory within the webspace
Within this location block, use the auth_basic directive to turn on authentication and to choose a realm name to be displayed to the user when prompting for credentials. We will use the auth_basic_user_file directive to point Nginx to the password file we created: /etc/nginx/sites-enabled/default
server {
    listen 80 default_server;
    listen [::]:80 default_server ipv6only=on;

    root /usr/share/nginx/html;
    index index.html index.htm;

    server_name localhost;

    location / {
        try_files $uri $uri/ =404;
        auth_basic "Restricted Content";
        auth_basic_user_file /etc/nginx/.htpasswd;
    }
}
Step 6
Save and close the file when you are finished. Restart Nginx to implement your password policy:
sudo service nginx restart
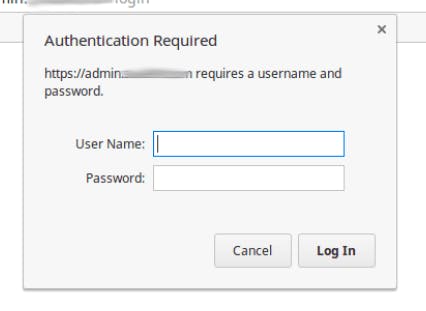
The directory you specified should now be password protected. Finally, open your IP and you will be prompted for a user and password.
I believe by now your password authentication should be enabled.